Sunday, July 25, 2004

New Slipcover


After I start sewing, QH wants to have "new" sofa set, i.e. the new covers for the sofa/loveseat. The existing cover is not removable, so it has not been maintained well in the past 6 years. And under the California sunshine, the color has faded quite bit. It is time to get new cover.

I get some books about DIY slipcover from the library, I think it is too ambious for me to make the slipcover myself based on my current sewing skill. And the fabric are expensive here, I guess it is better off for me just get the slipcovers from the store directly.

I did some research at surefit.com at home and tried to convince QH that the slipcover will fit since it is called surefit. At least we decide to give it a try. We planned to the local store Linen 'n Thing at the weekend, so in case it doesn't fit, it will be easily to return.

After some discussion and walking (we also checked out the Bed Bath and Beyond across the street), we finally agreed on one (Champagne), even though it is far from the perfect one in my mind, I hope I can work with it. The most important thing comparing to the existing cover is this one is really stain-resistant!!! Hope it will live a long long life. Total Cost : ($70+$80) - 20% = $120 + tax. With $120, I am not sure whether I can get the fabric if i did the slipercover myself, a lot of time and stress are saved too!

Put it on is not hard, but it takes sometime to make it look good, like the picutures on surefit.com. Tuck, tuck, tuck... and you will get there eventually if the shape of the sofa is not too odd. WARNING: most of hardwork will go down the drain if you try to sit on it. It makes to realize that the pretty picture is taken before anyone sitting on it. So in normal situation, it will NOT be picture-prefect!

The picture above is taken with some old toss pillows. It seems a little bit dark for me, maybe it is the lighting in the room, I need to re-work the pillows to add more color for the room.

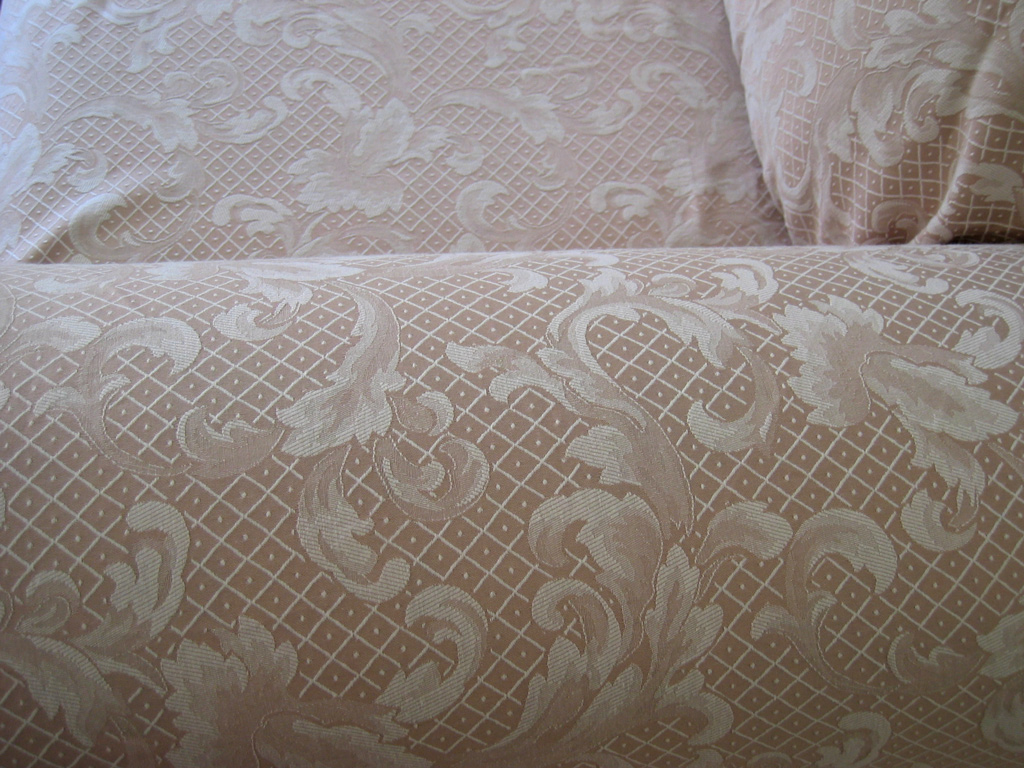
The picture below shows the details of the fabric.


Saturday, July 24, 2004

Happy Anniversary


Made this one for QH from our 5th anniversary. The frame was bought at Aaron Brothers.

Sunday, July 04, 2004

Garage Makeover - The Seat Cushion


This time is about the cushion, not the bench.

Even though this cushion is far from perfect, you can't even take a closer look at it, I am still very proud of myself. This is my first sewing project, EVER! I made it!

I have no idea about sewing before, even though i have a sewing machine at home amd i watched my mom sewing from very young age. Sewing is always very intimdating to me for some reason, maybe it is the old sewing machine and I was always afraid that the needle was going to be broken.

Now I have a large piece of fabric at home, and i need to make some use of it. I though making a seat cushion should be really cool, considering i ready have a sewing machine, it is not much to be invested in the project. I got a few(about 10) sewing books from the library, picked a style i like followed the step-by-step instructions, finally i made it.

Well, it is not really that easy. First, i need to learn how to use the sewing machine. I have to say this sewing machine is definitely not dewing-dummy friendly. It took almost two hours to get everything in place and ready to sew. Of course, I have no idea what i am doing, all i have is the instrcution manual, which is for people know how to sew. I am so afraid that i am going to do something stupid to break the machine, smokes coming from the machine. Luckily this sewing machine is quite durable, it still functions quite well after my "abuse".

Secondly, you have let the sewing machine do the things you want. I will never imagine how hard it is to stitch a straight line. The speed of the machine seems out of control to me, it will go from 0 to 100 in one second, I just hope my car do not that my sewing machine. I know, i know, it takes time, patient and practices to get there, i just learned all the lessons the hard way.

Eventually I am happy about the result. The total cost of the cushion:
  • foam: $4.00 x 3 - 40% = $7.20
  • batting: $1.00
  • zipper: $2.50
  • cord for the piping: $4.00
  • total: $14.70
Now I used half of the curtain fabric. I am wonding what i am going to do with the remaining? I guess i am not going to use the sewing machine for a while.


Sunday, June 27, 2004

Garage Makeover - The Shoe Bench


As part of the garage makeover, we want to have simple, functional, yet elegant solution to our shoe storage, at the same time, serving as a bench for taking on/off bulky shoes in winter. As you may know, we only have a narrow space left after cars parked inside the garage, the dimension of the bench will be important for us.

It is hard to imagine that a simple bench can cost $100, not to mention they are either too bulky or too simple for show storage. And apparently we don't have the skills to build one to our specification, we have to keep looking.

Luckily, there is an IKEA store closeby, even though it may not be QH's favoriate store. I did some research on catelog and IKEA's web site before going to the store. I nailed our choice to three:
  1. KANTRA, Bench: $79.00
  2. LEKSVIK, Shoe rack: $69.00
  3. OTTENBY, Bench: $99.00

Our final choice is LEKSVIK! It is not easy decision, it took us two trips to the IKEA store! This may not be our perfect selection, but we can work with it. The only problem I have is the color, it is too mark and it doesn't match our color scheme in the garage at all. I plan to spray paint it in the near future. Watch out for my future posting.

Saturday, June 26, 2004

Garage Makeover - The Water Heater Curtain


Everything is started from this curtain panel. The original goal is to buy something to cover the ugly water heater. The size of the opening is 39 by 79, the regular window cover such as blinds or rollers can't fit in here and the custom-sized blind would be a over-kill for this situation.

How about hanging curtain panel here? Doesn't it involve sewing? No, I'm a dummy when it comes to sewing, my sewing machine went to early retirement since it hadn't been touched in the past four years. We found these curtain panels at IKEA for $30, I only need one panel while it is sold in pairs. But the best thing about it is that it doesn't need sewing. The iron-on tape is provided to fix the border after I cut the length to size. We bought the simplest rod at Home Depot, hanging it is piece of cake.

But what can I do with rest of fabric? Only 1/3 of fabric is used, the rest will not be wasted, I promised QH.

Monday, June 21, 2004

Garage Makeover - The Shelves


I think I can be a really good project manager. I planned the shelf structures on the computer, wrote down a list of things we need to buy, had an estimate for buying from home depot or the container store, even had the budget approved by QH. Everything was planned during the week, when the weekend came, we were ready to go shopping.

No matter how prepared you are, things just happen. The design was changed during the construction because of the availablity of the studs in the wall. It also took us three trips to the home depot to get everything we need. Even though we ran into some bumps on our way, but in the end, we made it!

Here are some pictures from the construction. No picture was taken, the images below are captured from video.


The shelves are put into use quickly.


Monday, June 14, 2004

Garage Makeover - The Wall


This is our first home improvement project, it doesn't cost much, but it was a lot of labor. It took two persons, two weekends and a few trips to the home depot to get the job done. Of course, we learned a lot of lessons after this experience.

It is hard to imagine how ugly the unfinished wall is, and it is hard to imagine we have lived here for six years. After painting the wall, it looks much bigger and brighter, all the effort is well worth it.